The difference between System Backups and Data Backups.
A Data Backup is a backup archive of a file or a group of files containing a copy of selected file/folder contents. When you create a Data Backup, only the data, along with the folder tree, are compressed and stored.
System Backups are different. System Backups store snapshots of the User Partition at a certain point in time. The snapshots include the operating system, registry, drivers, software applications and data files, as well as system areas hidden from the user.
NOTE: This process will take some time depending on the amount of data in your Factory Image.
System Backup
If you've upgraded your SoftThinks Backup and Recovery application, you now have additional flexibility for scheduling your System Backups.
The System Backup feature allows you to restore your device back to the Factory State. With the new SoftThinks Backup and Recovery upgrade, you can also create and schedule specific recovery points. When you first set up your device or upon upgrading your system, you should immediately create a System Backup Image.
A System Backup Image takes a snapshot of all the programs, system settings, and files on your device. The System Backup Image can be used for recovery if your device ever stops working.
You can choose to store your System Backups on either your local drive in a protected folder, or on any attached USB drive. You will need to make sure to have a USB drive with enough available space to store your System Backups, or it will not be displayed.
Note: You should create regular System Backups so that you can undo any settings or return to a point in time if the device becomes unstable.
Sometimes you may wish to exclude files from your System Backups to decrease the size of the backup, or files that you have stored at another location. Files can be excluded either by size, type or both as shown below:
- Photo exclusions will omit all of the following file types: .bmp .jpg .jpeg .gif .png .tif and .tiff extensions.
- Audio exclusions will omit all the following file types: .aac .ac3 .aiff .au .m4p .mp1 .mp2 .mp3 .ogg .omf .ra .ram .rm and .wma extensions.
- Video exclusions will omit all of the following file types: .asf .avi .divx .dv .mlv .m2p .m2v .moov .mov .mpeg .mpg .mpv .mkv .ogm .omf .qt .ra .ram .rm .rmj .swf .vob .wmv and .wm extensions.
- Size exclusions will exclude any single file that is the same size or larger than the selected file size.
Note: Please choose carefully since any selection you choose will be excluded from your System Backup and will not be recovered in case of a System Recovery.
How to create a System Backup
1.
Open SoftThinks Backup and Recovery and click on:
2.
Verify System Backup is selected:
3.
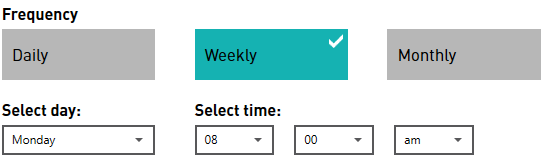
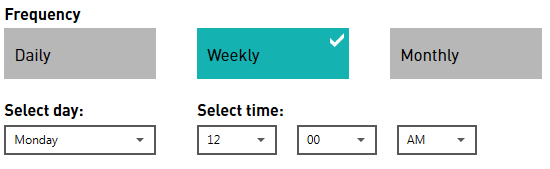
Note the current backup frequency:
If you wish to modify the frequency:
3a.
Schedule your system backup by clicking on "Scheduled".
3b.
Select the time you would like to schedule your backup to occur.
4.
Note the current backup location:
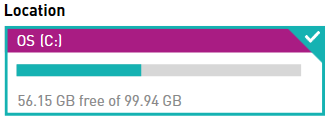
4a.
Local and USB drives connected to the device with enough space to hold your system backups will be displayed under "Location".
4b.
Click on the drive you wish to target from the list presented. The green square around the box indicates the currently selected drive. Faded drives indicate that there is not enough avaliable free space to house the backup and are not selectable.
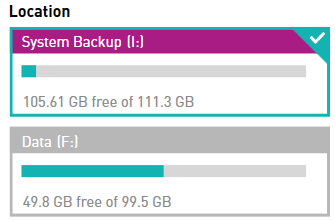
4c.
When satisfied with your location selection, click:

5.
File exclusions
If you wish to modify the file exclusions:
5a.
Click on "More options":

5b.
Click on "File exclusions" and select the file category you would like to exclude from your backup.
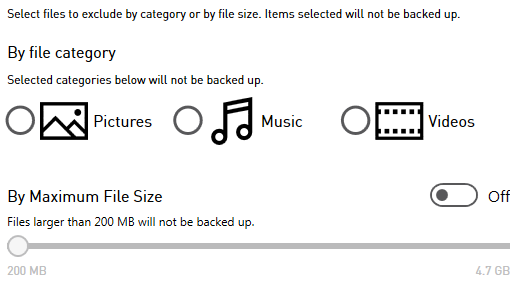
5c.
To exclude files larger than a given size, first slide the "By Maximum File Size" switch from OFF to ON and then click and drag the slider to your desired maximum allowed file size.

5d.
When satisfied with your exclusion options, click:
Then close the window by clicking on the "X" in the upper right hand corner of the screen.
6.
To begin the backup, click:

7.
A progress bar indicates how long remains on your system backup:
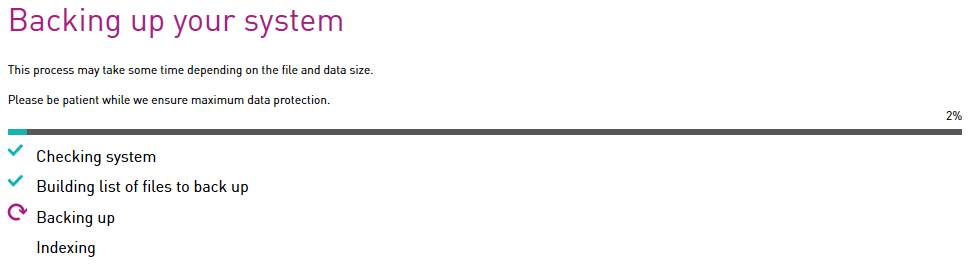
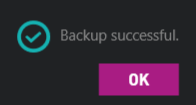
8.
When the backup completes you will see the following message:
To cancel the backup process, click:

More options - System Backups
Quotas - Set Maximum Disk Space allowed for your System Backups
If your System Backups are stored locally on your device you can limit the amount of space used for those backups. By default System Backups may consume up to 25% of the C: drive. This allocation may be modified but the allocation may never exceed 30% of the drive. Once you are near the limit set, you will receive a warning. Once the space limit has been reached, you have a few options on how to manage your System Backups.
File exclusions
Sometimes you may wish to exclude files from your System Backups to decrease the size of the backup, or files that you have stored at another location. Files can be excluded either by size, type or both as shown below:
- Photo exclusions will omit all of the following file types: .bmp .jpg .jpeg .gif .png .tif and .tiff extensions.
- Audio exclusions will omit all the following file types: .aac .ac3 .aiff .au .m4p .mp1 .mp2 .mp3 .ogg .omf .ra .ram .rm and .wma extensions.
- Video exclusions will omit all of the following file types: .asf .avi .divx .dv .mlv .m2p .m2v .moov .mov .mpeg .mpg .mpv .mkv .ogm .omf .qt .ra .ram .rm .rmj .swf .vob .wmv and .wm extensions.
- Size exclusions will exclude any single file that is the same size or larger than the selected file size.
Note: Please choose carefully since any selection you choose will be excluded from your System Backup and will not be recovered in case of a System Recovery.
File Cleanup
Delete System Backups
Deleting existing System Backups removes the selected System Backups, and will re-start your System Backup Chain.
Archive your System Backups
You could move all existing System Backups to external USB Hard Drive or USB Flash Drive. Old information will be stored in the USB Drive.
Merge your System Backups
Merge System Backups to save space by removing the older versions of files and keeping only the latest version of each file contained in those System Backups.
Instant Restore
Instant Restore allows you to repair your operating system and go back exactly where you were right before a crash occurred. All your personal files and settings will remain untouched.
SoftThinks recommends leaving this enabled so that we can repair your system if needed in the event your device will not boot.
Miscellaneous
For files that are protected by SoftThinks Backup and Recovery, you will see an icon overlay on each file. You can remove this icon overlay by turning OFF this feature under the "Overlay Icon Status" section.
Additionally, you have the ability to right click on a protected file and choose in the context menu to directly file from SoftThinks Backup and Recovery. You can disable this feature by turning it OFF under the "Context Menu Status" section.
A reboot may be needed to complete the change of these settings.
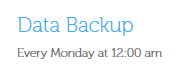
Data Backup
You can store your Data Backups to your local device, a second hard drive, DVD, a removable USB drive or a network. You can create Backup Profiles and select files based on categories, or choose specific folders to include.
If you've upgraded your SoftThinks Backup and Recovery application, you now have additional flexibility for scheduling your Data Backups or even protecting your most important data continuously. The Continuous Data Protection feature allows you to protect your working documents in real time and to roll back to any version saved some minutes or hours ago.
You can choose to back up manually, by schedule or continuously.
How to create or schedule a Data Backup
1.
Open SoftThinks Backup and Recovery and click on:
2.
Select Data Backup:

3.
Note the current backup frequency:
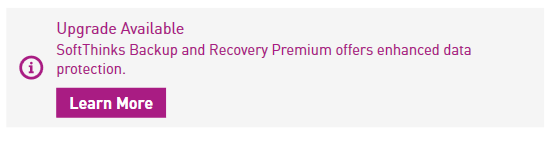
NOTE: The scheduling functionality will only be available if you have upgraded. To find out more about upgrading, click on the "Upgrade to Premium Edition" help topic.
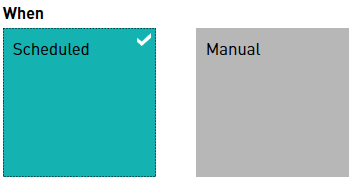
If you wish to modify the frequency:
3a.
Select "Scheduled" under the "When" section:
3b.
Select the frequency you would like the backup to occur.
Note: you will need to set the frequency only if you select "Scheduled", if you select "Continuous" the backup will occur as files change.
4.
Note the current backup location shown on the "Browse" button.
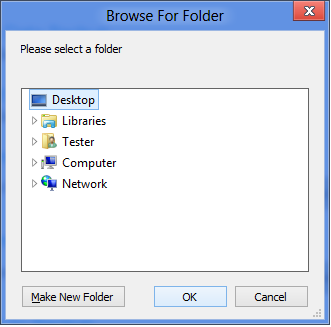
If you wish to modify the location:
4a.
Click on:

4b.
Use the "Browse for folder" dialog to find (or make) a location for your files to be backed up to.
5.
Note: the libraries are selected by default to be backed up:
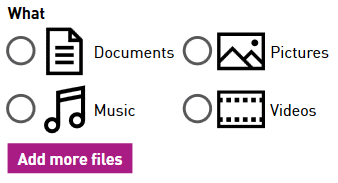
If you wish to modify the data to be backed up:
5a.
Click on:

5b.
To include specific files and/or directories in the backup, browse to their location in the tree under "Data Backup" and put a check mark next to their name.
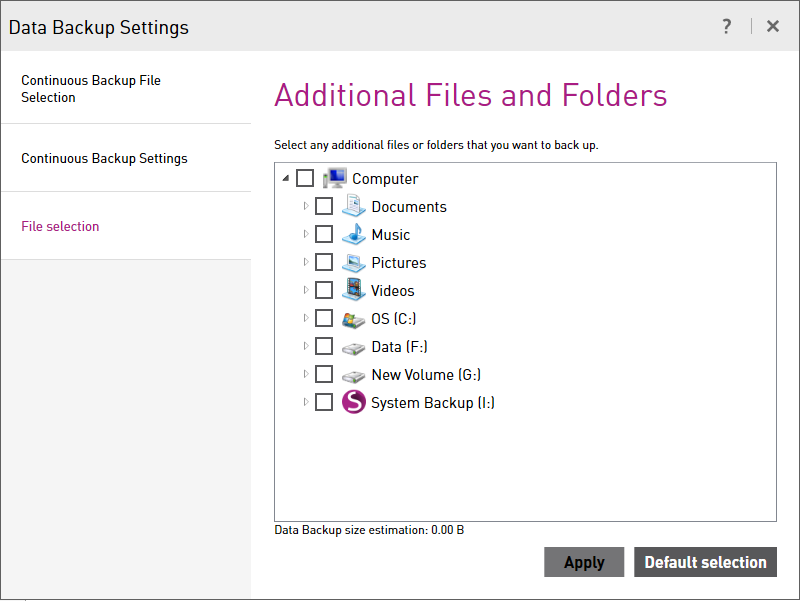
Note: use "Continuous Backup File Selection" when you have selected "Continuous" under the "When" section.
Use "File selection" when you have selected "Scheduled" or "Manual" under the "When" section.
5c.
When satisfied with your data selections, click:

Then close the window by clicking on the "X" in the upper right hand corner of the screen.
6.
To begin the backup, click:
Note: if you selected "Continuous", the "Backup Now" button will be grayed out. The backup will occur initially automatically and as files change.
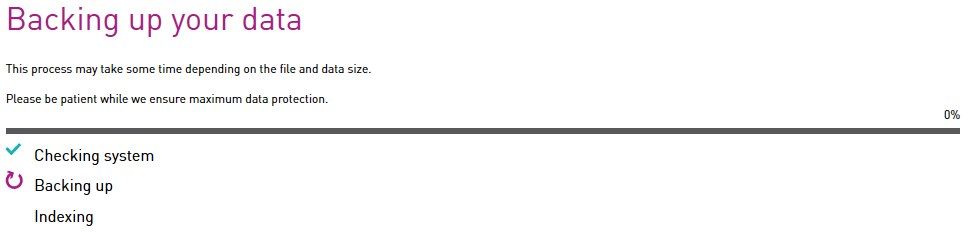
7.
A progress bar indicates how long remains on your data backup:
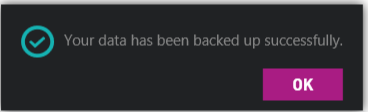
8.
When the backup completes you will see the following message:
To cancel the backup process, click:

How to protect continuously your data
1.
Open SoftThinks Backup and Recovery and click on:
2.
Select Data Backup:
3.
To enable this continuous data protection you need to have upgraded your product. If you haven't yet upgraded it, please upgrade the product:
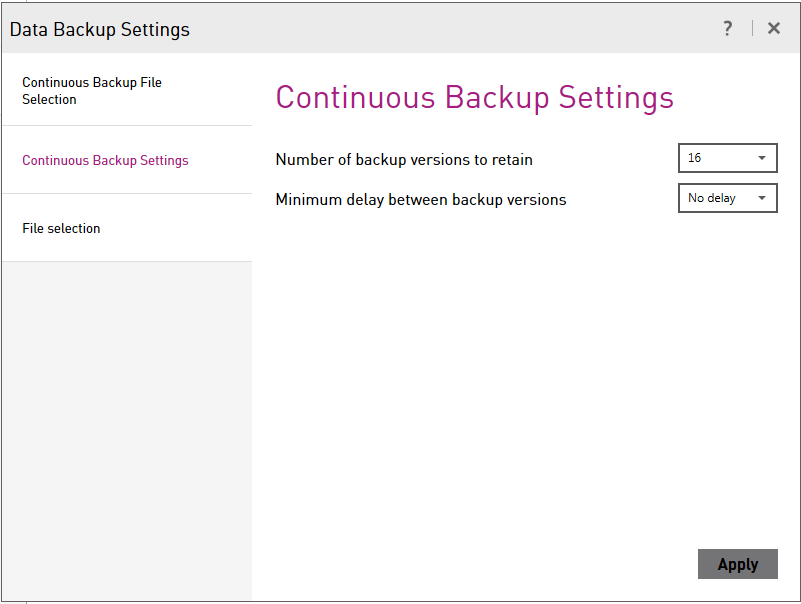
4.
Clicking on "More options" and "Continuous Backup Settings" will allow you to change the default settings such as the number of backup versions to retain and minimum delay between backup versions:
More options - Data Backup
File selection
This option sets the files that will be backed up when you are using the "Scheduled" or "Manual" settings.
This must be set separately from your continuous file selection settings.
Put a check mark next to the files you would like to be protected.